Salesforce Web-To-Lead Form With reCaptcha in WordPress.com Hosted Site

Salesforce Web-To-Lead Form With reCaptcha in WordPress.com Hosted Site
Recent Articles
Salesforce Web-To-Lead Form With reCaptcha in WordPress.com Hosted Site

This tutorial/blog is for anyone attempting to add a Web-To-Lead form to a WordPress.com hosted site. The entire process should take approximately 30 minutes for all of you beginner/intermediate Trailblazers. Please keep in mind that there are several 3rd party vendors who offer WordPress plugins to accomplish this, but be advised, most of them require that you have a self-hosted WordPress instance and will not work in the WordPress.com hosting environments without adding php code to the source files. This is a Salesforce solution and will not require any plugins of any kind and all necessary code will be provided in this blog.
Actions
- Add 2 custom fields to the Lead object
- Set up reCaptcha site on Google
- Create Web-To-Lead form and add the reCaptcha site key and secret key in Salesforce
- Add custom css to WordPress for styling the form
- Configure your final Web-To-Lead form code that will be added to your WordPress site
- Add the form to WordPress using a raw html element.
- Add a workflow rule that sends a visualforce email template to alert you when the form is submitted
Let’s get started!
#1
Add 2 custom fields on the Lead object.
- Label – “Comments” – textarea
- Label – “Web To Lead?” – checkbox
The “Comments” custom field will allow the user to ask a question or leave a comment. The “Web To Lead?” custom field will be a hidden field that is checked when a user has submitted the form. You will then use this field to filter your workflow rule.
Need a refresher on adding custom fields? Sign in to your Salesforce org. Go to Setup > Object Manager > (Select the Lead object) Next choose the “Fields & Relationships” link on the left. Click the “New” button and add the fields.
#2
Setup reCaptcha site on Google.
So you may ask “What is reCaptcha anyway?”. According to Google:
“reCAPTCHA is a free service from Google that helps protect websites from spam and abuse. A “CAPTCHA” is a turing test to tell human and bots apart. It is easy for humans to solve, but hard for “bots” and other malicious software to figure out. By adding reCAPTCHA to a site, you can block automated software while helping your welcome users to enter with ease”
Let’s set it up:
If you do not already have a Google account please create one now. Once you have an account go to: https://www.google.com/recaptcha/ – Click the “Admin Console” button at top right of page.

Once you are logged into the Admin Console click the + button.
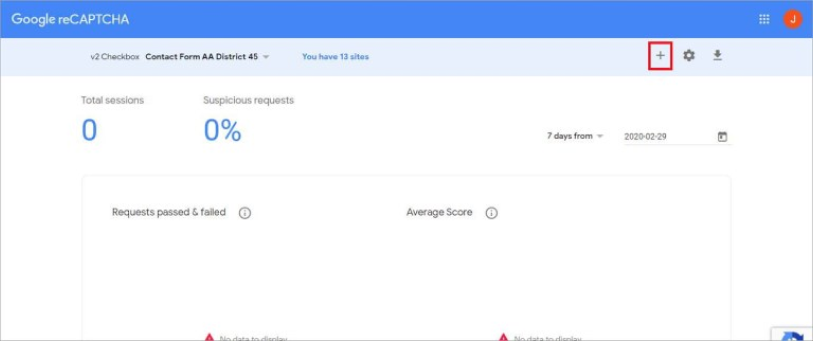
Create the site using the below values and enter your correct domain name. Do not forget to choose the reCaptcha v2! Very important. WordPress has experienced problems with v3.
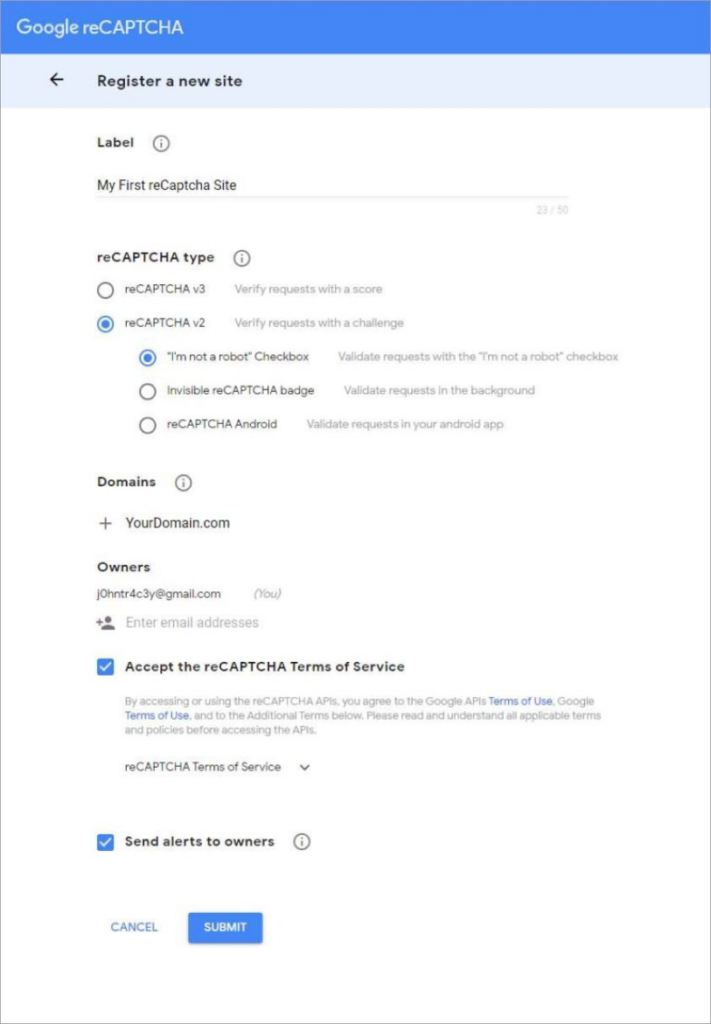
Now copy the site key and secret key to a text editor of your choice. Notepad, Notepad++, etc. Save this file where you can easily find it for the next part of this tutorial.
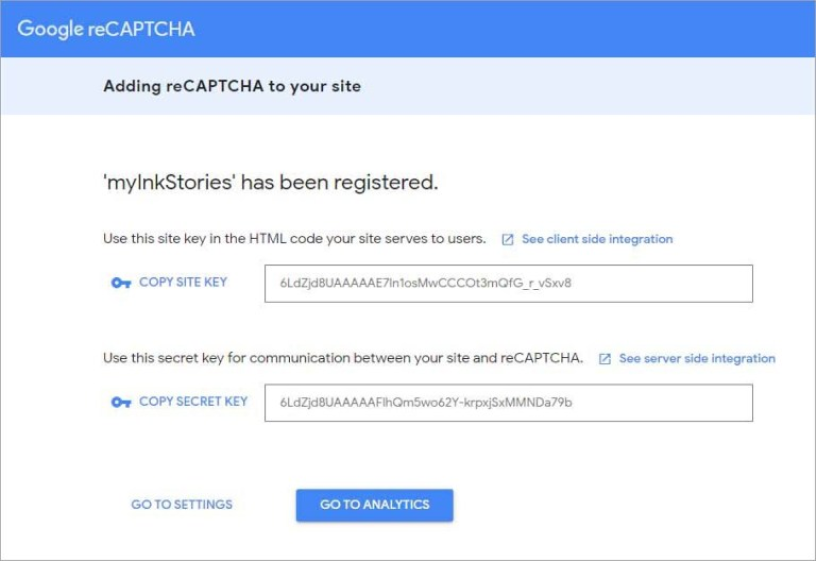
You have just generated the site key and secret key that you will need in the next part of this tutorial!
#3
Create Web-To-Lead form and add the reCaptcha site key and secret key in Salesforce
Open your Salesforce org and go to setup. Enter “Web-to-Lead” in the quick find box and then click on “Web-to-Lead”. Click the “Create Web-to-Lead” button.
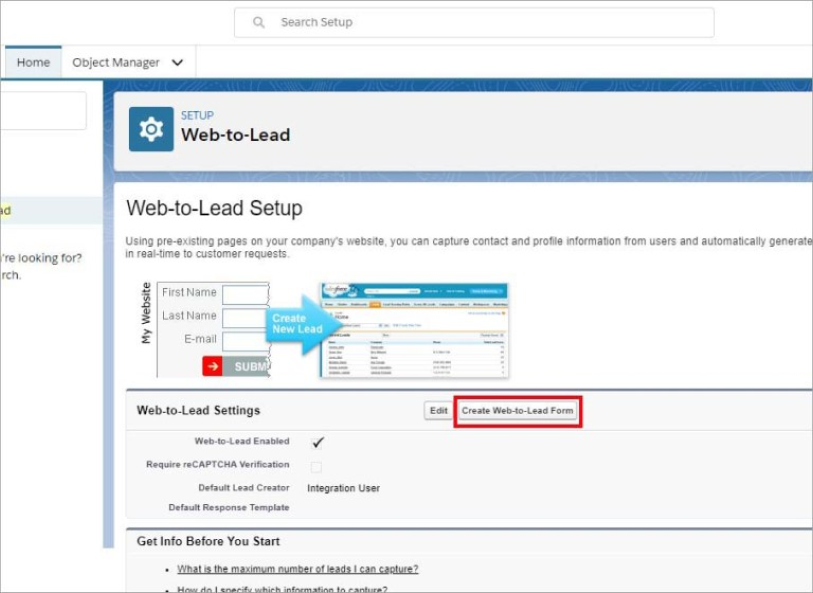
Setup the form.
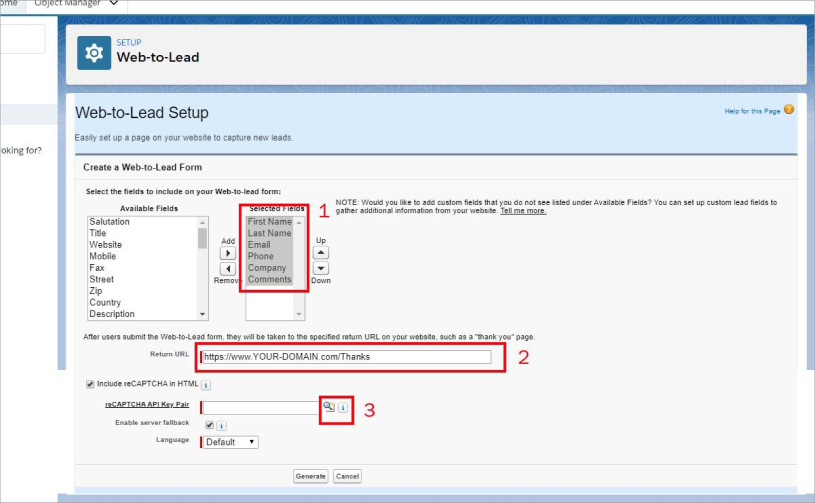
1 – Add the fields – First Name, Last Name, Email, Company, Phone and Comments(this is the custom field you added in the first part of this tutorial.
2 – Then add your “Return URL” – this is the “thank you” page that loads after the user submits the form. You will need to create this page in WordPress. Title it “Thanks”. You may simply duplicate your home or any other page with a large heading that says something like – “Hey thanks for contacting us. We will get back to you soon” – or whatever. Please use the following format as https is best bet. https://www.YOUR-DOMAIN.com/Thanks
3 – Now click the search icon next to the “reCAPTCHA API Key Pair” field.
You will then see a dialog popup screen. Click the “New” button.

Once you click the new button please shrink your screen so that it only takes up half the desktop and pull up the text next to it. That would be the text file with the site key and secret key that you already created and saved. Your screen should look like the below. (There is no other way to do this other then typing the code in by hand. You will have to just trust us on this.)
For “API Key Pair Nickname” you can only use letters and underscores – NO SPACES. Then copy your site key and secret key and paste them to the correct field.
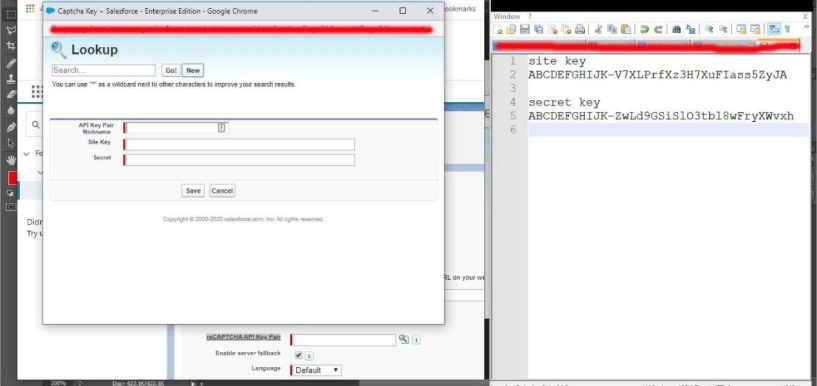
After you click the Save button on the above dialog you will be taken back to the previous screen and your “reCAPTCHA API Key Pair” will then be populated. Now simply click the “Generate” button. Then you will see the code for your Web-To-Lead form. Copy this code and paste it into your favorite text editor and name it: Starting-Code.txt
Good job!
#4
Add custom css to WordPress for styling the form
You are now going to add this css code to your WordPress site. This code will give your form some nice styling. Salesforce leaves that up to you as the code generated has no style at all and looks very bad. Copy this code:
.myForm
.myForm input, textarea {
border: 1px solid #ccc;
idth: 100%;
font-size: 14px;
margin: 0 -5px -5px 0;
padding: 8px 10px;
border-radius: 3px;
-moz-border-radius: 3px;
-webkit-border-radius: 3px;
box-shadow: 0 2px 2px #ddd;
-moz-box-shadow: 0 2px 2px #ddd;
-webkit-box-shadow: 0 2px 2px #ddd;
margin-top: 20px;
}

.myForm label {
    display: block;
}
}

div.myForm {
max-width: 30em;
margin-left: auto;
margin-right: auto;
background: #ffffff;
margin-top: 100px;
margin-bottom: 30px;
padding: 25px;
border-radius: 3px;
-moz-border-radius: 3px;
-webkit-border-radius: 3px;
box-shadow: 0 2px 2px #ddd;
-moz-box-shadow: 0 2px 2px #ddd;
-webkit-box-shadow: 0 2px 2px #ddd
}
To add the CSS code to your WordPress site go to – Appearance > Customize > Additional CSS
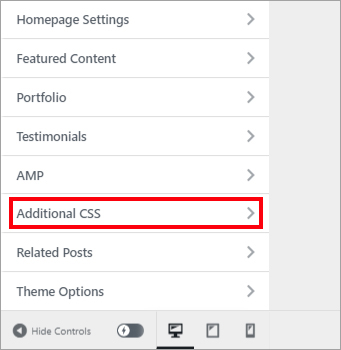
Click the “Additional CSS” button, place your cursor in the area provided and paste the code. Click the “Save Changes” button and that’s it.
Another fine job!
#5
Generate final code for WordPress
- Copy the code you saved earlier called “Starting-Code.txt”
- Paste the code into the form below
- Click the Generate Code button
- Copy the code that is generated.
- Save it to a file you can easily find
[our_shortcode]
#6
Add final code to WordPress using raw html element
This part you will have to work out on your own. Most WordPress editors have a “Raw Html” element that you simply paste the code into. And that’s all you have to do!
At this point you should test the form and reCaptcha on the page or post you added it to. Make sure to check in Salesforce confirm that the contents of the form are showing up in your Leads object. If you have followed all directions this will work.
Well done!
#7
Add a workflow rule that sends a visualforce email template to alert you when the form is submitted
Now you are going to need an email sent to you every time someone fills out the form you have just created. One of the problems with this is that Salesforce, by default, will not dynamically set the reply to address. It will be much more convenient if you can set the reply to address dynamically to make it easier for you to contact the person by simply clicking reply in your email client. Visualforce is the only way we have found to set the reply to address dynamically.
To do this we will first, setup a visualforce email template, then apply that to a workflow rule with criteria.
Go to setup in Salesforce and enter “email templates” in the quick find box > then click “Classic Email Templates”
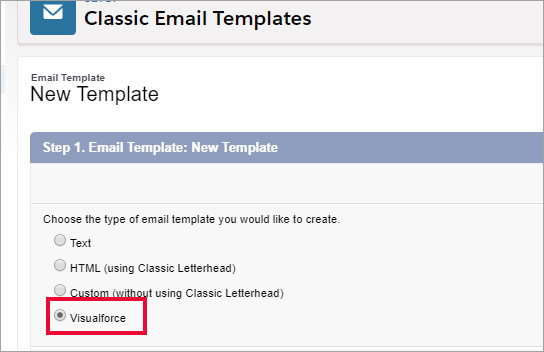
Next click the “New Template” button
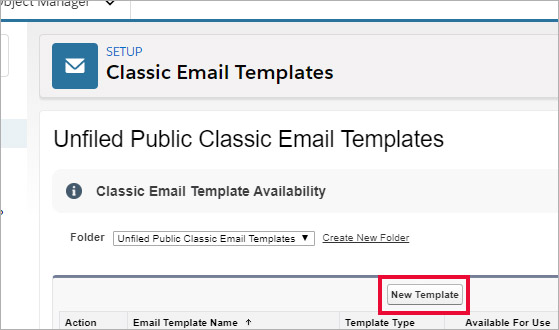
Now choose Visualforce and then click “Next”
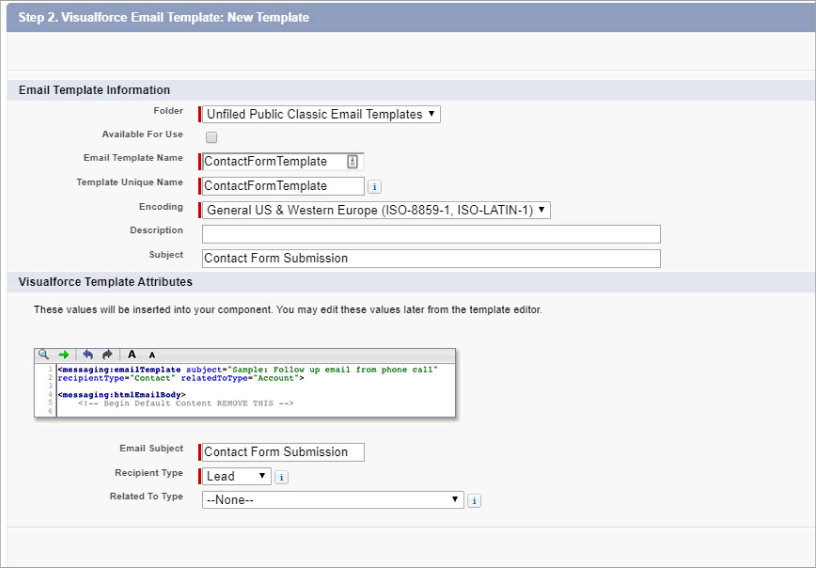
Now fill out the form details as laid out below.
Email Template Name = ContactFormTemplate
Subject = Contact Form Submission
Email Subject = Contact Form Submission
Recipient Type = Lead
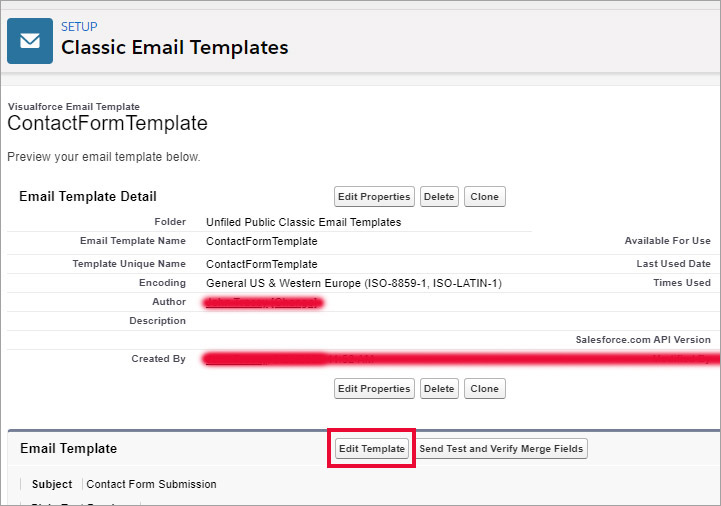
Click “Save” and then click the “Edit Template” button
Now delete what is there and paste in the code below and click “Save”
You just got a contact form submission from:  {!relatedTo.Name}

Email: {!relatedTo.Email}
Phone: {!relatedTo.Phone}
Company: {!relatedTo.Company}

Message:
{!relatedTo.Comments__c}
Next we have to make sure that the template is available for use. Click the “Edit Properties” button and then select the “Available For Use” check box and click “Save”
The email template has now been created!
Moving on, we will now create the workflow rule that uses our new email template.
Go to setup and enter “workflow rules” in the quick find box and the click “Workflow Rules”
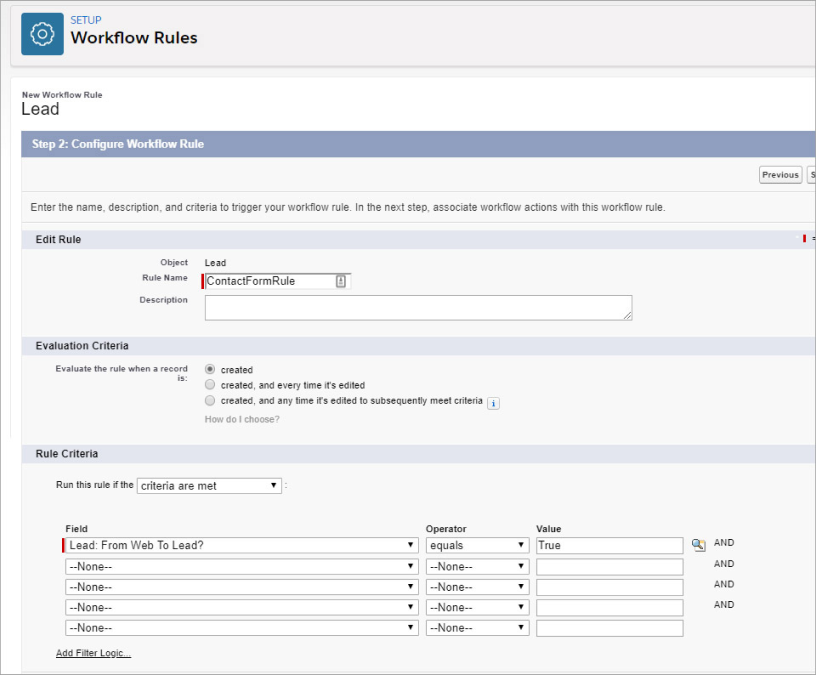
Next click “New Rule” and choose “Lead” for object and then click “Next”
Setup your page as below:
Rule Name = ContactFormRule
Evaluate the rule when a record is: Created
Run this rule if the critieria are met
Field Criteria = Lead: From Web To Lead? equals true
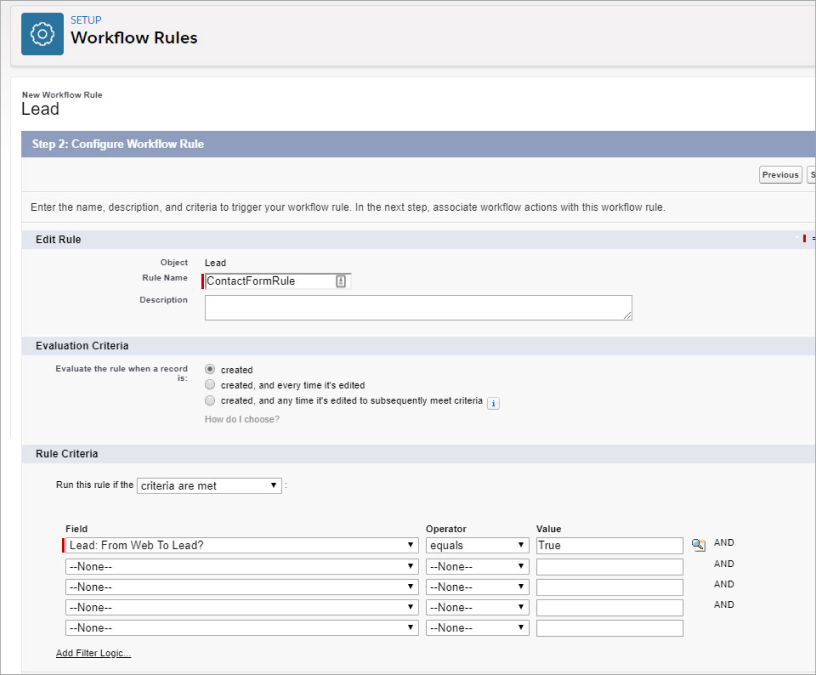
Click “Save & Next”
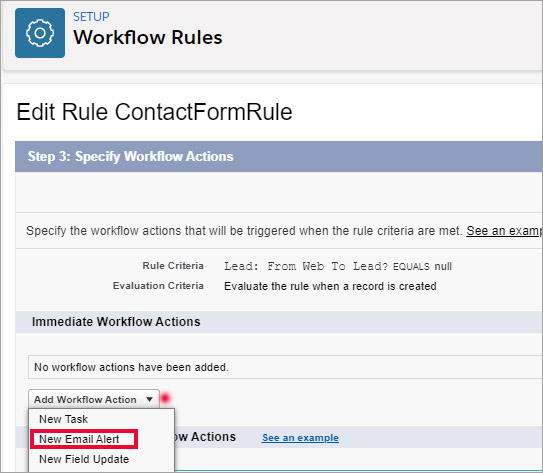
Now click the picklist that is labeled “Add Workflow Action” and then click “New Email Alert” from the list
Fill out this screen as below:
Description = Contact Form Email Alert
Unique Name = Contact_Form_Email_Alert
Email Template – click on the lookup icon and choose “ContactFormTemplate” that you created earlier.
Recipient Type – click the picklist and choose “Email Field”
Now choose it from “Available Recipients” and add it to “Selected Recipients”
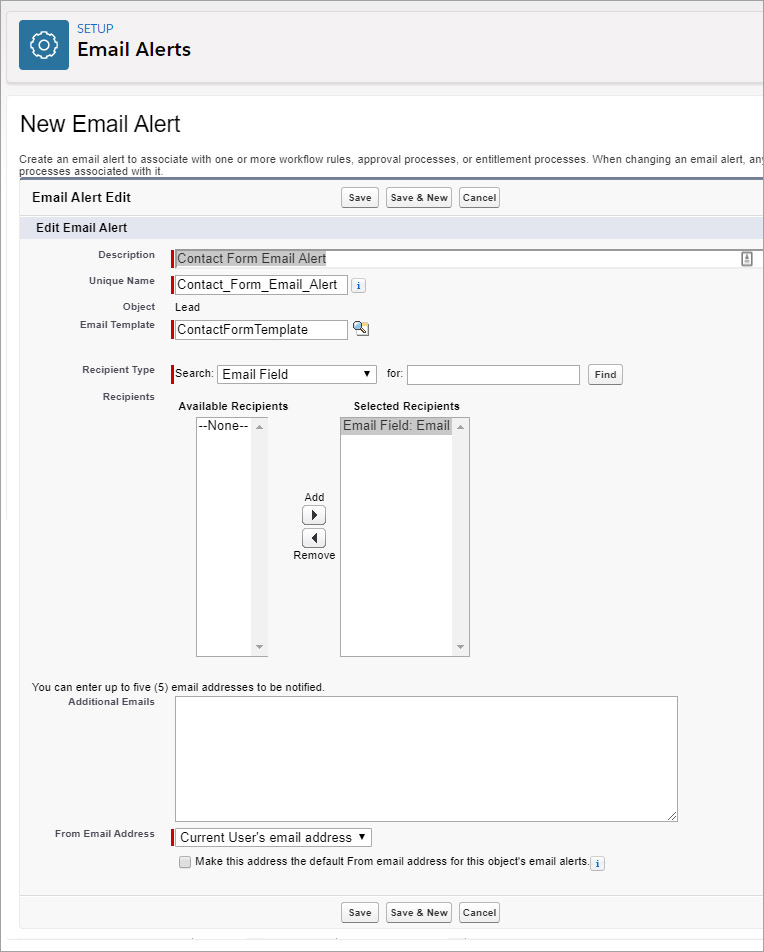
Now click “Save” and then make sure to click the “Done” button. And that’s it’s.
If you found this helpful or would like to reach out and discover other ways we can help you, click the button below:


